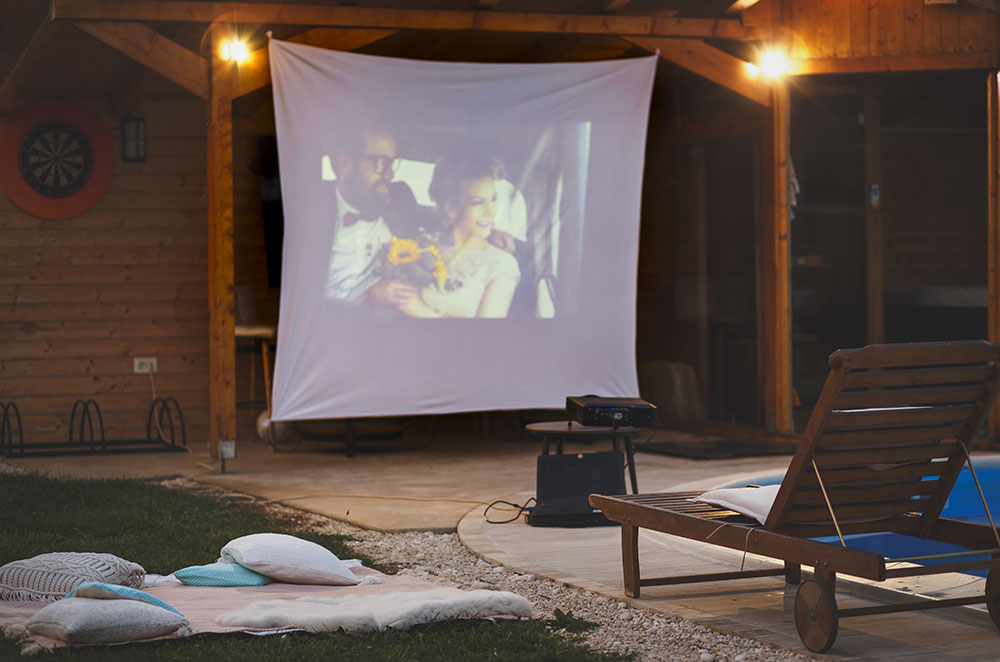
Summer is synonymous with many things, including blockbuster movies. Who doesn’t have fond memories of gathering with friends to witness a long-anticipated flick on opening night? But you don’t have to pay exorbitant prices in a theater packed with strangers to have such a cinematic experience. Here’s how to create an open-air movie night in your own backyard that’s as fun as it is memorable.

The best place to start is with the fundamentals: location and equipment. There are many factors to consider with each, so think through what makes the most sense for you based on your property, budget, and preferences.
Location
When deciding where to craft your theater, the two keys to keep in mind are the screen and spacing. You need to have enough room to comfortably seat all your guests while also having a suitable surface to project on. For the latter, the most budget-friendly option would be to use a large blank wall, such as the side of your house or even your fence. Solid, light surfaces are best for the clearest picture, or you could hang a thick white or beige sheet, taking care to secure it taut to avoid having wrinkles distort the image.
However, if such a spot isn’t available or sits in front of a cramped area, you could always invest in a portable screen that is easy to set up and pack away, allowing you to move it wherever would be the most comfortable for your guests. Do you have a big deck? Put it by the railing on the long end, then add rows of chairs of varying heights, including low Adirondacks in the front and cushy barstools in the back. Prefer to lounge in the grass in true summer fashion? Place it at the edge of your property, leaving a wide expanse for laying cushions and blankets in front of a few chairs. There’s no right or wrong answer, so experiment with the screen until you find the best arrangement.
Equipment
Naturally, an outdoor projector is a must-have for that big-screen feel, and there are plenty of options available for every budget. For the clearest image, look for a high-quality model that supports HD or 4K resolution; other key components to assess include projection size, Wi-Fi and Bluetooth capabilities, and brightness. Many also come in a set with a screen, helping to simplify your shopping experience and ensure compatibility if you do decide to go that route.
Next, make sure your audio configuration is on point. Most projectors these days have built-in speakers, which may work great for small gatherings. But if you’re hosting a larger crowd, consider pairing yours with a more comprehensive sound system. After all, the magic is ultimately lost if not everyone can hear the dialogue clearly.
Miscellaneous items
Beyond the basics, determine what other equipment might be essential. For instance, you’ll need a table to set your projector on along with an extension cord for powering it up if your selected spot isn’t near an outlet. And it may be worth getting a tent for protection in case the weather turns a little drizzly; as a bonus, an enclosed one would also give you a surface to double as a screen.

The ultimate movie experience is as much about the ambience as it is the film. Wherever you choose to set up, keep these elements in mind to transform the space into a truly cozy haven.
Seating, pillows, and blankets
Your guests may all prefer to settle in differently, so provide a mix of seating options, such as lawn or patio chairs and plush cushions for sitting on the ground. Add in some colorful throw pillows for extra comfort and style, making the space feel inviting and playful, as well as a few outdoor throws—depending on the time of year and your region, temperatures may dip at night.
Lighting
Fairy lights or string lights are essential for creating a magical atmosphere. Drape them across nearby trees, hang them along your fence, or wrap them around poles to add a soft glow that contrasts perfectly with the darkness of the evening. Consider also using floor lanterns or pathway lights to guide the way to seating areas, the snack table (more on that below), and the house, allowing your guests to feel comfortable moving around without tripping. Just remember to position any lighting away from the screen to avoid distracting reflections or glares.
Music
To make the evening more intimate, curate a selection of songs from movie soundtracks that complement the night’s film. Playing a soft background score while everyone’s trickling in will set the mood perfectly.

No movie night is complete without snacks, starting with classic popcorn. But jazz it up a little with various topping options like white cheddar seasoning and chili powder. Or provide some fun mix-ins like candy, pretzels, and melted caramel for a sweet-and-salty combo everyone will love. For the ultimate spread, though, throw in some other savory and dessert choices, such as pepperoni pizza twists and cookie-popcorn bars. And you can’t go wrong with a summer staple: s’mores. To avoid having to keep a fire stoked the whole night, consider this portable version you can make in advance.
Once everything’s prepared, set it all out on a nearby table along with plates, napkins, and utensils as applicable. Aim for a spot that’s relatively sheltered, such as right along your house, or keep it inside to prevent anything from blowing away in a stronger breeze.
Equally important is offering refreshing drinks to quench everyone’s thirst. You can set up a DIY drink station alongside your snack bar with water, lemonade, iced tea, and even a fun cocktail (or mocktail). Serve it all in Mason jars with colorful straws or personalized labels to add a touch of whimsy.
After getting all your pieces in place, the only thing left to do is wait for your guests to arrive! Then once the sun sets and the sky grows dark, you can fire up the projector, grab some popcorn, and settle in with your loved ones to enjoy a summer cinematic experience like no other.
Summer adventures are best savored with simple joys: warm sunshine, laughter with loved ones, and the irresistible allure of a cool treat. Whether you’re planning a grand celebration or seeking a peaceful afternoon at home, these fun recipes can add a touch of sweetness to your carefree escapades.
Infuse the taste of this classic soda flavor with vanilla ice cream to create delicious and creamy desserts.
With endless customization options, these chilled sandwiches will immediately brighten any day of the week.
This dazzling concoction features a medley of colorful fruits and a golden graham-cracker crust, resulting in a dessert that’s sure to please.
Quick and easy to prepare, this twist on old-fashioned ice–cream sodas will no doubt bring a smile to your face. Make a batch to spread the joy with family and friends!


This recipe makes it easy to create multiple variations of these chocolatey desserts, which you’ll love for their convenient snacking and irresistible creaminess.

Serves 6


There’s something incredibly refreshing about luscious blueberries, blackberries, and strawberries, and this dessert combines them all, satisfying your sweet tooth while providing you with an ample serving of fresh fruit!

Serves 6–8
Tip: Feel free to customize this recipe with your favorite berries! You can even stick to just one type with a preserve of your choice if you prefer.


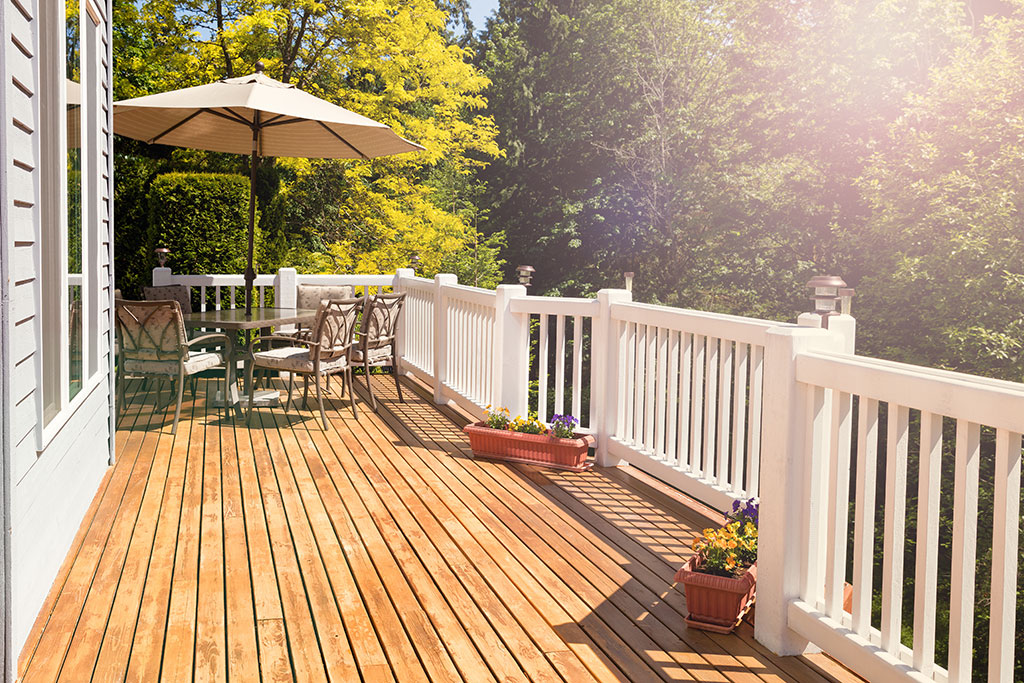
Decks are full of endless potential for fun and relaxation alike—they set the scene for lounging and taking in a cool breeze, looking out proudly over your lush landscaping, firing up the grill with your loved ones, and more. Further, their eye-catching construction can pull together a beautiful backyard design. If you’re eager to upgrade your property with such a feature, here are the primary factors to weigh along with some creative inspiration you may want to keep on deck.
First of all, it’s important to distinguish these surfaces from similar alternatives. Whereas a patio is typically built on the ground, decks utilize vertical joists to elevate them. They also aren’t generally covered, unlike porches and verandas, which are shielded by attached roofs. Though decks are often constructed with wood, they don’t necessarily have to be, and there are many different styles you can choose from. Understanding all these nuances can help you find the proper installation expert and materials for the specific final product you envision.

Of course, you’ll also need to give serious thought to pricing before you proceed. As with any home-improvement project, the total can vary based on the deck’s material and size as well as your location and choice of contractor. That said, according to the household-services directory HomeGuide, you can expect to pay between $25 to $50 per square foot. So if you’re interested in a 12’ x 20’ structure, for example, your final bill may range anywhere from $6,000 to $12,000. Also keep in mind that installing additional elements like a gate or stairs will likely increase this price estimate further.
Make sure to factor in secondary costs as well. For one, obtaining a permit from your local building inspections department may be necessary before installation can begin; this step costs $1,647 on average according to the home-project experts at Angi. That may sound steep, but the penalty for not getting one can be even higher. Moreover, you may need your HOA’s up-front approval for the work to avoid a fine. And other costs may arise after the deck is complete, including future maintenance like resealing and an increase to your monthly home-insurance premiums to cover the addition.
You may assume that you could save on construction, at least, by taking a DIY approach, but the complex framework involved means you could run into expensive issues down the road. Unless you’re experienced with this work, you risk producing lower-quality results that eventually require extensive repair or rebuilding costs and may even be dangerous, making it well worth the investment to rely on a professional.

If the above figures leave you raising your eyebrows, one way to help keep them down is by selecting your material carefully. Many options offer decent affordability without compromising beauty, practicality, or longevity, and some may even minimize your ongoing maintenance costs. Here are some of the best to consider along with the distinct benefits of each.
Composite
Built from a mixture of natural wood fibers and recycled plastics, this material resembles genuine hardwood and is available in a wide array of colors and textures—no staining or painting needed. It’s also on the lower end of the price range, costing an average of $17 per square foot. (Check your area for exact pricing.) You can choose from capped or uncapped composite, but note that the former offers a protective plastic shell for ultradurability.
Cedar and redwood
Naturally attractive, long-lasting, and insect resistant, these may be two of the greatest woods for a traditional deck. Though they can develop dents or other damage, they may still last for decades with consistent refinishing (approximately every three years). Further, cedar and redwood are more environmentally friendly than pressure-treated wood, which, despite being inexpensive and hardy, could expose you and your loved ones to harmful chemicals. You can expect to pay about $5 and $20 on average per square foot respectively for them.
Aluminum
Who says decks have to resemble wood? While aluminum may seem like a peculiar option and is a touch pricier than others (upward of $20 per square foot), its high weight tolerance, fire-resistant properties, and invulnerability to mold and pests make it one of the longest-lasting selections you could find.

The type of material you choose goes hand in hand with aesthetics, especially when paired with compatible details like furniture and landscaping. Use these visual concepts as inspiration to help you build a deck that perfectly suits your tastes.
Party-perfect venue
The ideal celebratory scene begins with a warm-hued wooden base. For the best setting, create several distinct conversation zones with their own railings, even varying the heights of each. Imagine, for instance, a circular dining spot that sits a few steps down from a grilling zone. Finish the look with comfortable furniture, potted flowers, string lights, and shade features like umbrellas to craft the optimal ambience for lively occasions.
Sleek setting
Does your home feature cutting-edge structural elements and interiors? Carry them to the outdoors with a contemporary deck design that lets quality materials speak for themselves. Opt for an aluminum or gray-composite deck with diagonal planks, and top it off with artful furniture and sparse decor, such as those from CB2 or AllModern, for enviable sophistication.
Rustic escape
For the vibe of a wild nature preserve right outside your back door, build a natural-finished or natural-looking wooden deck that extends the length of your home’s rear facade. Decorate it simply with Adirondack chairs and a hibachi grill to recreate the feeling of camping in the great outdoors. And to enjoy wildlife sightings from said seating, set up birdhouses and feeders out in your landscaping, then keep your binoculars handy.

Because every home, family, and budget are unique, no one-size-fits-all solution exists for building a beautiful backyard deck. To put together the most fitting design, look to your abode’s architecture and yard’s natural features for inspiration. Where can you position the structure so you can enjoy the best views around your house? Which materials or colors would blend naturally into your environment? Creating a deck that simultaneously stands out and pairs perfectly with its surroundings can result in a satisfying home feature. And if you communicate your financial limits to a contractor in detail, you can ensure that the results are well worth their reasonable investment.
As adventurous as summertime can be, its excessive heat can also wreak havoc on your life—especially when accompanied by humidity. As you’ve likely experienced (especially if you live in a naturally humid climate), dense air can feel inescapably oppressive, cause allergies to flare, and even make breathing difficult.
And if it’s affecting you, imagine what it could be doing to your home. Interior humidity is like a ninja in this sense, stealthily damaging both the structure itself and its contents. Fortunately, there are several steps you can take to help protect your place from this muggy menace.
Excess moisture in your home’s air can result in several layers of damage, with superficial issues such as peeling paint, wallpaper, and laminate being most frequent. The worst-case scenario, though, is structural: humidity can weaken and rot wood flooring, frames, walls, and beams, leading to a compromised framework. And if black mold is involved anywhere, you may need to get a professional involved to help remedy the situation, both for the health of your loved ones and your home.
Your personal belongings aren’t immune to destruction either. Extra dampness can ruin expensive items like furniture, and clothing and other fine linens can easily become musty and moldy in such conditions. As if all this weren’t frustrating enough, pests such as dust mites, centipedes, and cockroaches are attracted to wet environments, creating yet another problem to deal with.
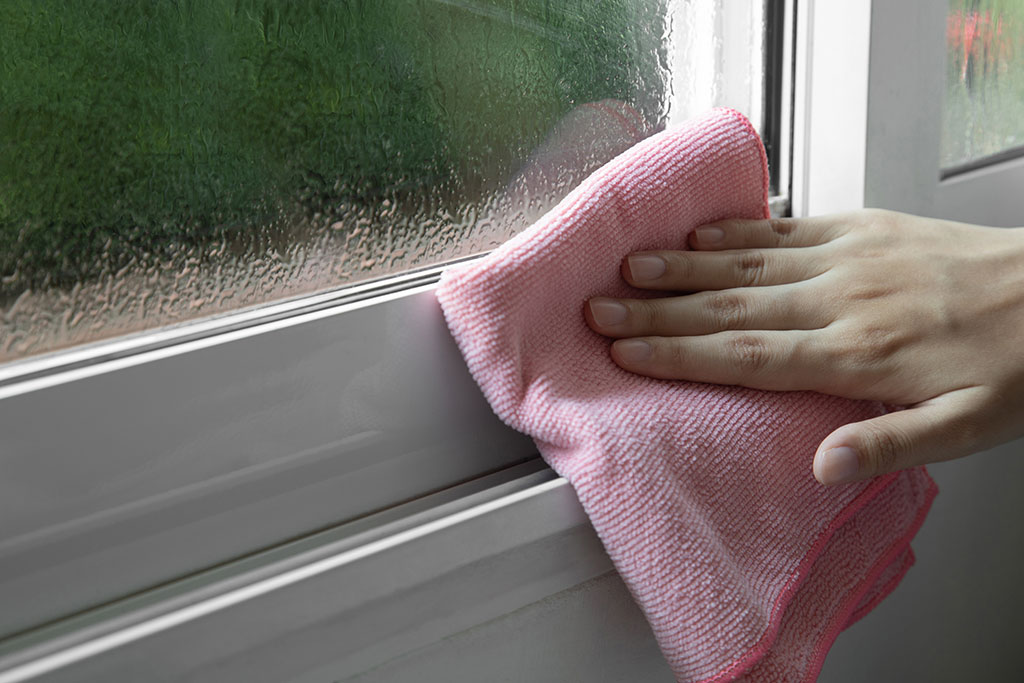
The bottom line: if you notice any telltale signs of high humidity—whether through feeling it on your skin, smelling mustiness, or seeing evidence like moisture on windows—start making plans to remediate it right away.

It’s important to first understand what you should aim for. In general, experts agree that a home’s relative humidity should be kept below 60 percent, with the EPA recommending an ideal range of 30 to 50 percent. To achieve these levels in your home, consider investing in products such as the following and making some simple changes to your living habits.
Humidity-reducing tools

Three impactful lifestyle choices
1. Minimize interior-created humidity
A big source of humidity is bathrooms, where commonsense steps can make a huge difference. Primarily, bite the bullet and take cooler, shorter (five-to-ten-minute) showers, running your exhaust fan during and after them. (If you don’t have one, keep the door slightly ajar and, in more temperate seasons, the window cracked to allow moisture to escape.) Similarly, turn on your kitchen exhaust fan when cooking on the stove while also using vented pan lids to control the steam.
And don’t hesitate to employ old-school tricks. A simple way to reduce humidity after the aforementioned showers is to wipe down the bath, walls, and ceiling after you’re done, which will immediately remove standing moisture. On nicer days, you could even consider reverting to the classic method of hanging wet items on clotheslines—thus preventing 100 percent of any humidity that would be produced by your dryer.
2. Eliminate primary sources
Outside humidity can’t impact your home if you stop it from entering in the first place. To start, check all windows and door frames for gaps, then seal them with silicone caulk where necessary to ensure that they’re airtight. Just as important, check your pipes and gutters to confirm that you don’t have any leaks.
In addition, you’ll want to examine an often neglected source of humidity creep: your foundation. If your gutters or yard slope is in poor condition, more water will likely seep through your soil into your home’s foundation, causing it to weaken. Seek out professionals to fix these respective areas if the need arises, and hire a basement or foundation expert regardless to do an inspection for complete peace of mind.
3. Create airflow
Preventing your indoor air from getting stagnant is another key to keeping humidity at bay. A good rule of thumb (weather and temperature permitting) is to open your windows during cool, dry conditions to create a cross breeze that will naturally dehumidify your home. Running your ceiling fans clockwise will also provide consistently cool air circulation. Finally, barriers like clutter and furniture can affect airflow—whether it’s provided by Mother Nature or your AC unit—so make sure that nothing is blocking windows and vents and leave bedroom doors ajar as often as possible.
Keep in mind that humidity isn’t always a problem. In fact, without enough of it, common household materials such as paint, caulk, and wood can shrink or crack. Whenever mugginess ramps up, though, take proactive steps to neutralize it and help prevent expensive home-related repairs and replacements down the road.